Sunday 28 March 2010

justanote


This tutorial was written by Elizabeth on 28/03/2010 using psp9.
Any similarities to any other tutorial is purley coincidental.
This tutorial is for those with a eorking knowledge of psp.
Awesome kit from here or click on title.
Tube from MTA you must have a licence to use this art.
Font of choise.
Dropshadow 1,1,50,11, black, dropshadow as you go.
New image 600x600 flood fill white.
Open element e16>resize by 75%>c/p> change mode to (difference)
Open Element e20>resize by 65%>c/p>free rotate 90% right.
Open element e6> resize by 35%>c/p>move to center.
Duplicate move down.
Open element e26>resize by 65%>free rotate 58% right>c/p>move to right.
Adjust> sharpen> adjust >sharpen more.
Open music note> selection tool draw round note you want>resize by 23%>c/p.
Use as many of these as you want.
Open element e22>resize by 65%>free rotate>90% right>c/p.
Open your tube you may have to resize it>c/p> place where you want.
Layers >merge visable>resize by 65%.
New raster layer> add your copyright>licence number.
layers> merge visable>new raster layer>add your name. layers>merge visable.
Thats it you are done, i hope you enjoyed this tutorial.
Elizabeth x.

Saturday 27 March 2010

Antigone kit by juicybits


This tutorial was written by Elizabeth on 27/03/2010 using psp9.
Any similarities to any other tutorial is purley coincidental.
This tutorial is written for those with a working knowledge of psp.
Stunning kit from here or click on title.
Mask candys mask 8b from here open and minimise for now.
Tube from ami if you use this tube you must have a licence.
Font of choise.
Dropshadow 1,1,50,11, black, dropshadow as you go.
A very quick easy tutorial, with lovely effect.
New image 600x600 flood fill white.
Open paper 20> c/p>Layers>new mask>find your mask 8b>apply>ok.
Layers >merge group.
Open frame 20> c/p.
Open doodle 1>resize by 65%>c/p>place top left>duplicate>mirror.
Open flower 10>resize by 65%>c/p>duplicate>mirror.
Open your tube> c/p>place below the frame.
Layers> merge visable>resize by 75%.
New raster layer> add your copyright>licence number.
Layers >merge visable.
New raster layer>add your name>layers merge vi sable.
That's it you are done. i hope you like this tutorial.
Elizabeth x

Spirit of spring


This tutorial was written by Elizabeth on 27/03/2010 using psp9.
Any similarities to any other tutorial is purley coincidental.
This tutorial is written for those with a working knowledge of psp.
Stunning kit from here or click on the title to take you to the store.
Becky mask 22 sorry no link.
Font of choise.
Tube of choise i used a free to use artist.
Dropshadow 1,1,50,11, black dropshadow as you go.
New image 600x600 flood fill white
New raster layer > c/p > paper 4>layer> new mask> look for your mask>apply>ok.
Layers>merge group.
Open element br 2 > c/p.
Open element ss br >resize by 65%> c/p > resize by 65% again>place at bottom of bow.
Open rainbow 1>resize by 65%> move to top>duplicate>flip>move to bottom.
Open banquet 1 >resize by 65% > place in middle of bow.
Open briliant >c/p> place where you want.
Open hummingbird>resize by 65%> place on the left.
Open butterfly 1>c/p> move to top of bow> duplicate>move down.
Open your tube >c/p >place where looks good.
Layers> merge visable>resize by 75%.
New raster layer>add your copyright and licence number.
Layers>merge visable.
New raster layer> add your name> layers >merge visable.
Thats it you are done, i hope you enjoyed this tutorial.
Elizabeth x

Wednesday 24 March 2010

canzone di primavera ptu pspgirl


This tutorial was written by Elizabeth on 24/03/2010. using psp9.
Any similarities to any other tutorial is purley coincidental.
This tutorial is written for those with a working knowledge of psp.
Beautiful kit from here
Font of choise.
Tube of choise if you use the one i used you must have a licence.
Dropshadow 1,1,58,11, black, dropshadow as you go.
New image 600x600 flood fill white.
Open element 20>c/p>resize by 65%.
Open element 2>c/p> resize by 55%.
Muras filter copies> just change number to 7 and circle.
Open element 21>c/p>resize by 75%.
Open element 17>c/p>resize by 75%>free rotate 35 right>duplicate>mirror.
Open element 34 >c/p> resize by 65%.
Open element 35>c/p> did not resize this.
Open element 36>c/p>resize by 75%.
Open element 60>c/p>resize by 65%.
Click on leaf frame>selections>modify>expand by 10>ok.
Open paper 6>resize by 65%>c/p>selections>invert>delete>selections none.
move below leaf frame.
Add your tube you may have to resize it.
Layers> merge visable> resize by 75%.
New raster layer>add your copyright>licence number.
Layers>merge visable>new raster layer>add your name.
Thats it you are done, i hope you enjoy this tutorial. Elizabeth x

Tuesday 23 March 2010

Vana by Fantasy Dreams


This tutorial was written by Elizabeth on 23/03/2010 using psp 9.
Any similarities to any other tutorial is purley coincidental.
This tutorial is written for those with a working knowledge of psp.
Beautiful kit Vana here or click on the title
Template 113 designs by Ali here
Gems mask 134 from here open and minimise for now.
Font of choise.
Tube of choise if you use the one i used you must have a licence.
Dropshadow 1,1,58,10, black. dropshadow as you go.
Open template>ctrl and d to duplicate.
New raster layer>send to the bottom>flood fill white.
Open paper 2 > c/p> new mask layer> find mask 134>apply>ok>merge group>resize by 124%.
Open paper 3 >resize by 65%.
Click on shape 1> c/p> paper 3 > selections >invert >delete.
Click on raster 1>open paper 23>resize by 65%> c/p > selections>invert>delete.
Layer palette> delete shape 1.
Do the same to shape 2 and 3.
Click on doodles layer>magic wand>flood fill dark brown.
Click on first frame>add your tube you may have to resize>move bolow frame.
Merge paper, frame tube> do the same to 2 and 3,resize by 75%.
Resize staples by 65%.
Open element 23> resize by 65%> c/p.
Open element 3 >resize by 65%> c/p.
Open element 24 >resize by 65%>c/p.
Layers>merge visable>resize by 65%.
Layers >new raster layer>add your copyright and licence number>Layers merge visable.
Layers>new raster layer>add your name>merge visable.
Thats it you are done, i hope you enjoyed this tutorial, if so let me know by mail or in my shout box.
Elizabeth x

Bliss sky scraps


This tutorial was written by Elizabeth on 23/03/2010. using psp9.
Any similarities to any other tutorial is purley coincidental.
This tutorial is written for those with a working knowledge of psp.
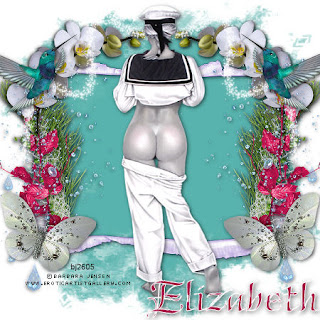
Stunning kit by sky scraps here or click on the title.
Nic's mask 020908-05 from here open and minimise for now.
Tube of choise i used barbara jensen you must have a licence to use her art.
font of choise.
Dropshadow 2,2,58,11,black, dropshadow as you go.
New image 600x600> flood fill white>new raster layer> choose a nice colour
from one of the elements>layers>new mask>find nic's mask 020908-05>
apply>ok>layers>merge group.
Open frame three>choose a nice colour>i used pale purple from bird2.
Click on your "change to target" (its above your erracer) and do small clicks
round your frame untill its all colourised>c/p>resize by 75%.
Now decorate the frame with elements of choise.some beautiful elements.
i used
Bird 2 >resized by 60%>c/p>resize again by 85%
Element 7 >resized by 65%
Drop 2 > duplicated > and mirrored.
Element 2 >resized by 65%.
Element 6 >resized by 60%.
Butterfly 1 >resized by 45%.
Element 5 >free rotate 90% left.
Flower 11 >resized by 70%
Layers> merge visable>resize by 75%>new raster layer.
Add your copyright>licence number.
New raster layer> add your name.
Thats it you are done, i hope you like this tutorial, if so drop me a line.
or in my shout box. Elizabeth x

Monday 22 March 2010

Venus blog freebie, Athena Designs


This tutorial was written by Elizabeth on 22/03/2010. using psp9.
Any similarities to any other tutorial is purley coincidental.
This tutorial is written for those with a working knowledge of psp.
Awesome kit from here or click on title to take you to the store.
A stunning mask from here Nik-mask 1226-19, Open and minimise for now.
Beautiful tube by sanju mpt you must have a licence to use this art.
Font of choise, i used black chancery.
Dropshadow 1,1,58,11,black, dropshadow as you go.
New image 600x600>open paper 3>resize by 75%>c/p>layers>new mask
find nik's mask 1226-19>apply>ok>layers> merge group>resize by 85%.
With your magic wand and shif key held down, click on the 5 shapes on the right.
c/p your tube, you may have to resize it, move where you are happy with it.
>selections>invert>delete>selections> selections none.
Do the same with the oblong shape, but change the blend mode to luminance legacy.
Add any elements you want.
I used doodle 2.
Butterfly 3
Feather 2.
Doodle 1.
Layers> merge visable>resize by 75%>new raster layer>add your copyright licence number.
Layers> merge visable>new raster layer>add your name.
Thats it you are done, i hope you enjoy this tutorial, if so let me know.
e-mail or in my shout box. Elizabeth x

Sunday 21 March 2010

tropical dreams


Two tags from one kit, here click on title will take you to store

Saturday 20 March 2010

Friday 19 March 2010

Darker side of easter sampler freebie


Great kit from here

My blog has been given a Sunshine award


Thank you so much jessica, for my blog award
now to pass on name 12 blogs
Nette's here
Gems taggin here
Vaybs here
Athena here
Ishona's here
NaughtyAngel here
Nikki here
Itha's here
Wicked Princess here
Stayyseee here
Fantasymoments here
Fantasy dreams here

Monday 15 March 2010

Beautiful Elegance ptu


This tutorial was written by Elizabeth on 15/03/2010 using psp9.
Any similarities to any other tutorial is purley coincidental.
This tutorial is written for those with a working knowledge of psp.
Awesome kit from Altlor designs here
Wsl mask 246 from here open and minimise for now.
Tube of choise mine from cilm you must have a licence to use this art.
Font of choise.
Dropshadow 1,1,58,11, black, dropshadow as you go.
Ok lets begin, the sun is shining on this Monday morning.
New image 600x600 flood fil white> open paper 9>resize by 75%>c/p.
Image>new mask layer>wsl 246>apply>ok>layers>merge group>resize by 85%.
1) Open frame 1>resize by 75%>c/p.
2) Open heart charm>resize by 65%>c/p>place over bow.
3) Open doodle 1>resize by 75%>c/p>move under frame>duplicate>mirror>flip.
4) click on frame >selections >modify by 10>open paper 6>resize by 75%>c/p>selections>invert>delete>move below frame.
5) Open doodle 3>free rotate 90%right>resize by 30%>c/p>duplicate>mirror.
6) Open your tube>c/p>resize if needed>move below frame.
7) Layers> merge visable>resize by 75%>new raster layer>add your copywight> licence number>layers>merge visable>new raster layer>add your name>layers>merge visable.
Thats it you are done, i hope you enjoyed this tutorial, if so let me know, email or shout box.
Elizabeth x.

Sunday 14 March 2010

Sweetness ptu


This tutorial was written by Elizabeth on 14/03/2010 using psp9.
Any similarities to any other tutorial is purley coincidental.
This tutorial is written for those with a working knowledge of psp.
Stunning kit from here
Gems mask 103 from here Open and minimise for now.
An awesome image and tube from AMI, you must have a licence to use this art.
Font of choise.
Dropshadow 1,1,58,11, black, dropshadow as you go.
Ok lets begin.
Open a new image 600x600 flood fill white>pick a colour from an element>new raster layer>flood fill with colour of choise>layers>new mask find gems mask 103>apply>ok>layers merge group.
1) Open element 39>resize by 65%>open your image>resize to fit frame>layers>merge down>image>free rotate 20% left>resize by 65%>move up duplicate twice.
2) Open your tube> c/p> place so it looks nice.
3) Open element 37>resize to fit frame>c/p>duplicate>merge down>do the same to top and bottom all frames.
4) Open element 56>resize by 50%>free rotate 20% left> place top right.
5) Open element 12>resize by 50%>free rotate 20% right.
6) Layers> merge visable> resize by 75%
7) New raster layer> add your copyright and licence number>merge visable.
8) New raster layer>add your name>merge visable.
Thats it you are done. i hope you enjoyed this tutorial, if so let me know, email or in my shout box.
Elizabeth x

Saturday 13 March 2010

Lucky 4 U ptu


This tutorial was written by Elizabeth on 13/03/2010 using psp 9.
Any similarities to any other tutorial is purley coincidental.
This tutorial is written for those with a working knowledge of psp.
Beautiful kit from here
Vix mask 362 from here Open and minimise mask for now.
Tube of choice i used a free to use tube.
Font of choice
Dropshadow 1,1,58,11, black, dropshadow as you go.
A quick easy tutorial for you today.
New image 600x600 flood fill white>new raster layer>flood fill from a
colour of one ofthe elements.
Layers>new mask find vix mask 362>apply>ok>layers>merge group.
Open frame 9>resize by 65%>c/p>
Open butterfly>mirror>c/p>duplicate>merge down>place over frame butterfly.
Open your tube> c/p>resize to fit.
Duplicate frame>erace any overhanging the frame.
Open rainbow 1>resize by 60%>move down.
Open hat 2>resize by about 45%>move bottom left.
Add any other elements you want.
Layers> merge visable>resize by 75%.
New raster layer>add your copyright>and licence number.
Add your name>layers merge visable.
Thats it you are done. i hope you enjoyed this tutorial, if so let me know.
Elizabeth.

Monday 8 March 2010

Sleep well ftu


This tutorial was written by Elizabeth on 08/03/2010, using psp9.
Any similarities to any other tutorial is purley coincidental.
This tutorial is written for those with a working knowledge of psp.
Beautiful kit found here
Gema mask 33 found set 1 here open and minimise for now.
Font of choise.
Tube of choise if you use the one i did you must have a licence.
Dropshadow 1,1,58,11, black dropshadow as you go.
Ok grab that coffee, its a cold monday, so lets play in psp.
Open new image 600x600 flood fill white>open paper 9>resize by 85%>c/p.
Layers new mask find jems mask 33>apply>ok>layers merge group.
1) Open element 54>resize by 45%>c/p.
2) Open element 7>resize by 30%>c/p>move to top right.
3) Open element 21> resize by 30%>c/p>place under 1st moon erace any bit showing.
4) Open element 20>resize by 30%>c/p>move bottom left.
5) Open element 18> resize by 26%>c/p>move next to other teddy.
6) Open element 15>resize by 30%>c/p>move to top left of frame.
7) Open element 64>resize by 30%>c/p>place on top of bow.
8) Open element 44>resize by 30%>c/p>move to bottom right>duplicate>merge down>
duplicate>move down a little.
9) Open your tube> c/p> place it where it looks good. i also put a flower in the frame.
10) Layers merge visable>resise by 75%>layers new raster layer>add your copyright, licence number>layers merge visable>new raster layer>add your name.
Thats it you are done, i hope you enjoyed this tutorial, if you did drop me a line
or in my shout box. Elizabeth

Saturday 6 March 2010

Mardi Gras ptu


This tutorial was written by Elizabeth on 06/03/2010 using psp9.
Any similarities to any other tutorial is purley coincidental.
This tutorial is written for those with a working knowledge of psp.

Beautiful kit from here
Ufmask 13 from here Open and minimise for now.
Tube from Mpt you must have a licence to use this art.
Font of choice
Dropshadow 1,1,58,11, black, dropshadow as you go.

Ok grab that coffee, and lets begin

Open new image 600x600 floodfill white>open paper 10>resize by 55%>c/p.
Open paper 19 >resize by 55% >c/p>free rotate 45%left>x out your background layer>
merge visable>reopen background layer.
Layers >new mask >find uf mask 13 >make sure INVERT MASK DATA IS ticked>apply ok.
1) Open frame 3 >resize by 55%> c/p.
2) Open eyemask 5>resize by 50%>c/p>move to top of frame.
3) Open feather purple>resize by 55%>c/p> place behind top frame>duplicate>move to bottom frame.
4) Open you tube >c/p> duplicate frame and place your tube so looks like she is
half in it>erace frame on the tube.
5) Click on first frame magic wand>selections>modify>expand by 10.ok>copy your tube
and place as you want>selections>invert>delete>selections none.
6) Open bling bow2> resize by 35%> c/p place on stick of eyemask>duplicate>move down a little.
7) Open butterfly1 >resize by 30%>place bottom right>duplicate>gives it a nice depth.
8) Open glitter splat 5> place above mask layer.
9) Open comedy mask >resize by 55%>place bottom left.
10) Open glass 1>resize by 45%>c/p>move bottom left.duplicate>free rotate 45%left>
place accross first glass.
Layers merge visable>resize by 75%>layers new raster layer>add your copyright
and your licence number>layers merge visable>new raster layer>add your name>
merge visable.
Thats it you are done, i hope you enjoyed this tutorial, if so drop me a line or in my
shout box. Elizabeth

Wednesday 3 March 2010

Sexy Maid PTU


This tutorial was written by Elizabeth on 03/03/2010 using psp9.
Any similarities to any other tutorial is purley coincidental.
This tutorial is written for those with a working knowledge of psp.
Beautiful kit from here
Vix mask 350 from here Open and minimise for now.
Tube from here You must have a licence to use this art.
Font of choise i used Black Chancery
Dropshadop 2,2,58,11, black dropshadow as you go.
Ok we have all the things we need to do this tag so grab your coffee and let's begin.
New image 600x600 flood fill white> new raster layer fill with colour from one of
the elements>layers >new mask find vix mask 350>apply>ok>layers merge group.
1) Open element 31 >resize by 114%>c/p> move a little to the left.
2) Open element 19>resize by 75%> c/p >move to right.
3) Open element 69>resize by 55% place on top of element 19.
4) Open element 77>place on left.
5) Open your tube c/p >place under your frame erace any parts of the frame that
cover the tube.
6) Open element 66>resize by 55%>place at the bottom of the frame>duplicate>move to the right>duplicate>move to the right.
7) Layers merge visable>resize by 75%>new raster layer>add your copyright and your licence number>layers merge visable>new raster layer>add your name>layers merge visable.
Thats it you are done hope you enjoyed this tutorial, if so drop me a line or in my shout box. Elizabeth.